| スリザーリンク ルールと解きRules and how to solve Slitherlink. |
ルール
Rules
- 次の条件に合うように四つの点で囲まれた枡の各辺に線分を引くか引かないかを決めていきます。 Decide whether to draw a line segment on each side of the cell surrounded by four points to meet the following conditions.
- 問題で指定された数字は四つの点で囲まれたこの枡の4辺のうち線分が引かれる辺の数を現わしています。 The number specified in the problem represents the number of sides on which a line is drawn out of the four sides of this cell surrounded by four points.
- 線分は途中で分岐したり交差することはありません。 Line segments do not branch or cross on the way.
- 線分のつながりは一つの輪っかになります。途切れて輪にならなかったり、二つの輪になったりしてはいけません。 The connection of line segments becomes one loop. It must not break off a loop, or form two loops.
スリリンの問題へ jump to slilin problem.
解くコツ
Tips for solving
スリザーリンクの基本は ある辺に線を引くとどこかで問題数字指定の本数の線が引けなくなれば 元の辺には線を引かない、
逆にある辺に線を引かないとどこかで問題数字指定の本数の線が引けなくなれば 元の辺には線をくことです。
しかし毎回このように考えていたら大変です。ある数字の配置の時には上の基本に戻って考えると線の引き方が決まるパターンがいろいろあります。
このパターンを見つけて覚えておくと解くのがスムーズになります。最初はこの特定の数字が並んだところ、特定の数字が特定の場所にあるところに注目です。二つの数字が縦・横・斜めに並んでいるところでは線分が引けるところが決まるものがあります。
隅や辺でも特定パターンがあります。 The basics of Slitherlink are: If you draw a line on a certain side, and if the number of lines specified by the problem number cannot be drawn somewhere, then do not draw a line on the original side.Conversely, if you do not draw a line on a certain side, and if the number of lines specified by the problem number cannot be drawn somewhere, then draw a line on the original side .
However, it is difficult if you think like this every time. There are various patterns that determine how to draw a line when you return to the basics above when arranging a certain number. Finding and remembering this pattern will make it easier to solve.
At first, notice that this particular number is in a row, and that the particular number is in a particular place. Where two numbers are lined up vertically, horizontally, or diagonally, there are things that determine where a line segment can be drawn.
There are specific patterns in the corners and sides.
|
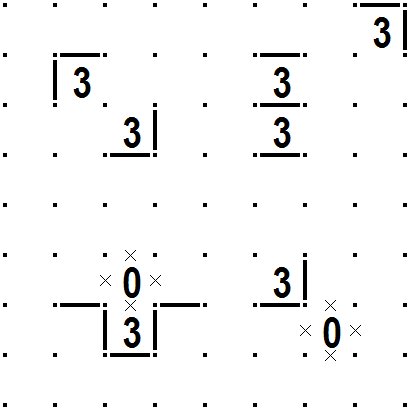
次の図を見てください。3が斜めに並んだところ、0と3が縦(横でも良い)に並んだところなどは図のように線分が引けるところが決まります。当然0が指定された枡の四辺には線分が引けませんので線分禁止のマーク×をつけておくと良いでしょう。 ×はあくまでも覚えですので慣れてきたらマークする必要はありません。 次の図のいくつかのパターンでは線を引いたところを線禁止にしたり、線禁止のところに線をひくと確かにどこかで矛盾が起きることを確認してみてください。 自分なりのパターンを見つける練習にもなります。 See the following figure. Where 3 is arranged diagonally, where 0 and 3 are arranged vertically (or horizontally), etc., the places where line segments can be drawn are determined as shown in the figure.Naturally, line segments can not be drawn on the four sides of the cell where 0 is specified, so it is better to put a mark × for prohibiting line segments. You don't need to mark × as you get used to it, as it is a reminder. In some of the patterns in the following figure, try to make the line where the line is drawn banned, or try to make the line banned where the line is drawn, then there will certainly be some inconsistency. It is also a practice to find your own pattern. |
|
|
あとは線分が引けたところ、線分禁止が確定したところの近辺に注目し、線分の輪が二つにならないように、あるいは輪にならず途切れてしまわないように線を引くにはどうしたらよいかも考えながら線分を引いたり、禁止の場所を決めていきます。 ある場所で行き詰まったらそこで悩みすぎるより他の場所を考えると良いでしょう。 Pay attention to the area where the line is fixed or prohibition is confirmed , and make sure that does not have two loops. Or draw a line while thinking about how to draw a line so that it does not break , and decide where to prohibit. If you get stuck in one place, it's better to consider another place than to worry too much. |
|
|
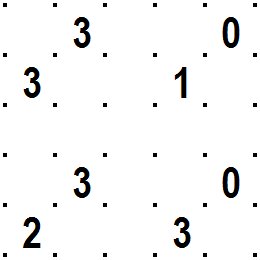
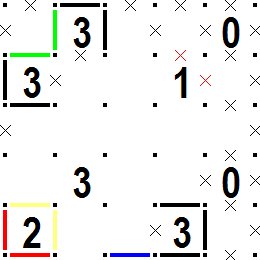
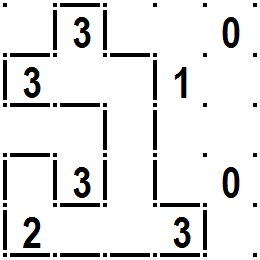
では実際の問題で考えてみましょう。 次の図が問題です。最初は定型の数字の並びを探します。 Let's consider the actual problem. The following figure is the problem. First, look for a fixed sequence of numbers. |
|
|
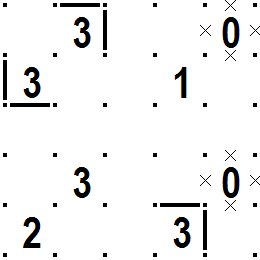
左上の3が斜めに並んだところ、右下の0と3が斜めに並んだところでは次の図のように線分が引けるところが確定します。 同時に0の周りには線分禁止をマークしておきます。 There are 3s diagonally conectted in left upper area and is arranged diagonally, 0,3 connected in lower right area, about these cells line segments can be drawn are determined as shown in the following figure. At the same time, mark line prohibition around 0. |
|
|
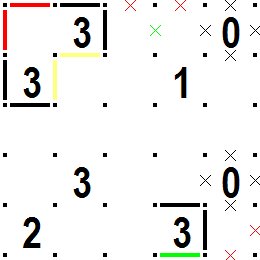
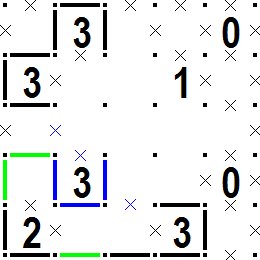
今度は右下の0の右下の赤の×印を見てください。ここは線分を引くと途切れてしまいますので線分禁止となり、
ここが線分禁止となるとその左下も線分が引けませんので禁止となります。すると緑の線分が引けます。 中央上の部分でも赤の×印の部分2か所は線分が引けませんので緑の×印の部分も線分禁止となります。 左上の3が斜めに並んだ部分で赤色の線分を引くと、黄色の線分に決まってしまい、線分の輪が複数できてしまいますのでこの赤い線分は引けない(禁止)ことになります。 Now look at the red × at the bottom right of the 0.Here, if you draw a line segment, it will be interrupted, so line segments are prohibited. If a line segment is prohibited here, a line segment cannot be drawn at the lower left, so it is prohibited.Then you can draw the green line segment. Even in the upper part of the center, no line segment can be drawn at the two places marked with red ×, so the line marked with a green × are also prohibited. If you draw a red line segment at the upper left daiagonally arranged 3 , it will be decided as a yellow line segment and there will be multiple loops of line segments, so this red line segment can not be drawn (prohibited). |
|
|
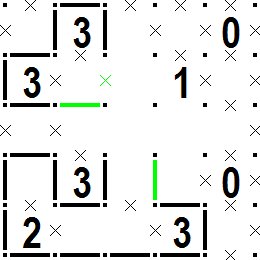
左上の3が斜めに並んだところでは次の図のように緑の線分が確定します。 右下の3のところでも青の線分が確定します。 左下隅の2のところを考えてみるとこの隅の枡の周囲に2本の線分を引く方法は赤色の線分2本を引くか、黄色の線分2本を引くかの二通りしかありませんが、 黄色の線分を引いてしまうとその右上の3の枡の周囲に3本の線分を引くことができなくなりますので、ここでは赤色の線分しか引けないことが分かります。 右上の0と1が斜めに並んだ周囲の赤色の禁止×も決まります。 Where the upper left 3 is arranged diagonally, a green line segment is fixed as shown in the following figure. The blue line segment is also confirmed at the lower right 3. Considering 2 in the lower left corner, there are only two ways to draw two line segments around the cell in this corner: two red line segments or two yellow line segments. But if you draw a yellow line segment, you will not be able to draw three line segments around the cell 3 on the upper right of 2, so you can see here that only red line segments can be drawn. The red prohibition × around the upper right where 0 and 1 are arranged diagonally is also determined. |
|
|
左下の2の枡の2本の線分が決まると次の図のように緑色の線分が引けます。 続いて3の枡の周囲は青い線分と青の×印に確定できます。 When the two lines of the lower left cell 2 are determined, a green line can be drawn as shown in the following figure. Next, the area around the cell 3 can be confirmed with a blue line segments and a blue × mark. |
|
| 続いて次の図のように緑色の線分が決まります。 Next, a green line segment is determined as shown in the following figure. |
|
|
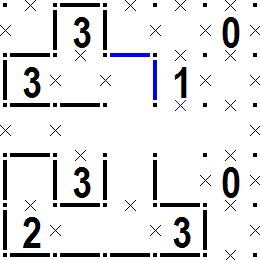
次の図のように青色の線分が引けると1の枡の周囲も決定します。 最後は線分のつながりが二つの輪にならないように、一つの輪になるように引けば完成です。 As shown in the following figure, when the blue line segment can be drawn, the circumference of the cell 1 is also determined. At the end, draw the lines so that they do not form two loops, and the connection is completed. |
|
|
次の図が正解です。 (×印は覚えです。線分位置が同じなら正解です。) いろいろな手筋がありますので、考えて身につけると難しい問題も解けるようになります。 The following figure is the correct solution. ( x marks are remarks. If the line segment positions are the same, it is correct.) There are various ways to learn, so if you think and wear them, you will be able to solve difficult problems. |
|
|
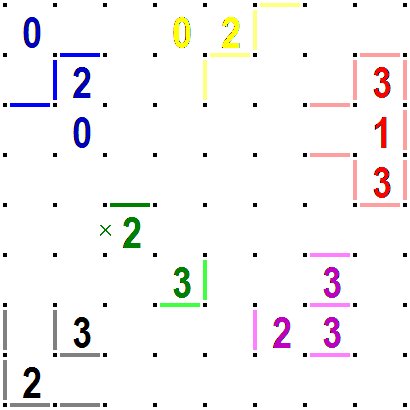
次にいくつかのパターン(手筋)を紹介しておきます。なぜこうなるかを考えてみると良いでしょう。 次の図の左上の青の020の配置では青の線が決まります。 上部の 問題の辺に配置された黄色の02では黄色の線が決まります。 右側の 問題の辺に配置された赤色の313では赤い色の線が決まります。 左下の 問題の角に配置された黒色の23では灰色の線が決まります。 右下の 紫色の332では紫色の線が決まります。 中央部の 緑色の32と線分、線分禁止なら薄緑色の線ば決まります。 これ以外にもいろいろな手筋があります。 Next, I will introduce some patterns. Thinking about why this would be a good exercise. The arrangement of blue 020 in the upper left of the following figure determines the blue line. A yellow line is determined by the yellow 02 placed on the upper side of the problem. The red 313 located on the right side of the problem determines the red lines. The gray line is determined by the black 23 located in the lower left corner of the problem. The purple line is determined by the purple 332 at the lower right. If the green line segment and × are fixed around green 3,2 cells at the center, light green lines will be decided. There are many other ways to do this. |
|
2020.2.28修正
2010.6.12作成
鴈野さんちのHomePage Top.
ご感想などは鴈野 敏生 まで。 2020.2.28 Modified
2010.6.12 First edition
Jump to top of Karino's HomePage.
mail to T.Karino